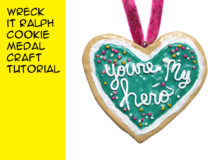
Make a Wreck it Ralph Cookie Medal for your favorite Stinkbrain

This Wreck it Ralph Cookie Medal makes a great costume prop for a Wreck it Ralph Halloween costume or any cosplay. Use polymer clay to make this Disney DIY for your favorite Stinkbrain.
Here’s the tutorial video
DIY Wreck it Ralph Cookie Medal

MATERIALS YOU WILL NEED
tan, white, pink and yellow polymer clay
chalk pastels
clay tools
transparent liquid clay
pink sparkle ribbon
small piece of wire or paperclip
mod podge gloss
paint brush
STEP BY STEP INSTRUCTIONS
Before you get started, find a picture of the medal online and print it out in the size you want your medal to be. You are going to use this printout as both a pattern and a reference for the whole project
You will need two packages of tan polymer clay for the cookie portion of this project. Take the time to condition the clay before trying to work with it. Make sure it is soft and pliable. Then use your conditioned clay pieces to build a heart shaped cookie using the printout as a guide for the shape and the size. As you work, it is important to keep the clay the same height throughout the cookie. Don’t make it too thin or the baked cookie could bend or even break, I suggest making it at least a quarter of an inch thick. If you have a lot of clay, the easiest method to make the cookie is to roll all your clay out and trim around the shape with a knife. I didn’t have enough extra clay to do that. So my process took a lot longer and was extra work. I added small pieces and smoothed them together. Working the front and then smoothing the back until my cookie took shape. I think it came out okay in the end.
Next it’s time to bake your cookie. The thing I forgot to do before I baked my cookie was to add a loop of wire on the back for the ribbon to go through. Now is the time to do that, before you bake it. Bake according to the instructions on your clay package
While the cookie is baking and cooling it is time to make some icing. There are lots of tutorial videos on how to do this. I tried two methods in this videos and honestly, I liked the second method better, but here is the first one if you want to try it.
Take some small pieces of white polymer clay and mix them with a generous amount of translucent liquid clay. Then smush it all around until the white is mixed in smoothly. You may need to add more liquid clay until you get a consistency that you’re happy with. You can see that I used a ceramic dish. But after making this project I have to recommend doing this on a paper plate instead. The dish ended up being really hard to clean afterward. I wasn’t too happy with this method, because it took a lot of time and effort to mix the white clay in, and I still had a few chunky areas that I missed.
While I waited for my cookie to cool, I practiced making the white letters. My first thought was to write the letters on with a water-based chalk marker. My second option was to create the letters out of tiny rolled out strands of white clay. The clay method was a more difficult option, but I decided it was worth the extra effort because the letters really looked like frosting. You can use any method you like to add the lettering.
Once your cookie is baked and completely cool it’s time to add the white icing in a thin layer. Make sure to leave some cookie showing around the edge.
Then back to the oven for a few more minutes of baking. You really only need about ten minutes in the oven for frosting, Keep an eye on it so it doesn’t get brown.
While the cookie is cooling, it is time to make some more icing. This time we will use the method I liked best. Again, use transparent liquid clay as the base, then scrape some light blue and green chalk pastels into the dish and mix them all together really well. Keep adding a little bit of color until you get a nice green aqua frosting. This method was much easier and came out much smoother than the original method of adding small bits of clay.
Once the cookie is completely cool, it’s time to add the aqua icing in a thin layer. Make sure to leave some white frosting showing around the edge.
Set your cookie aside and work on the sprinkles. Make 14 of each color; white, yellow, light pink and dark pink. Roll small pieces of clay using your picture as a guide. Mine were a little small, but they looked okay in the end.
Bake all 56 sprinkles for just a few minutes
The next step is to apply the baked sprinkles to the cookie. Nestle each sprinkle into the green frosting with a pair of tweezers. Use your reference picture to get the correct colors in the right positions. Or just sprinkle them on if you don’t care if they are perfectly screen accurate.
Then back to the oven for a few more minutes of baking.
Once you cookie is baked and completely cool it’s time to add the letters. I did this with small snakes of white clay and a craft knife to cut and shape. It took a long time to create the letters by eye. I started over on the first word three times before I was happy with the result. If you are going to use the clay method, be sure to take your time and have patience. You might have an easier time if you make the letters on the paper and carefully transfer them to the cookie. I did that with the letter H in hero, and it worked pretty well. I kind of wish I had done it that way with all of the words. Another idea is to make all your letters on the paper and pre-bake them. Then add them to the cookie with transparent liquid clay as glue. I have to admit that I have not tried that method, but it seems like it might work well. Shout out to my friend Shane for that idea.
However you decide create the words, once you are done placing the letters, bake your cookie for the final time.
Because I forgot to put a wire loop in the cookie before I baked it, I needed to glue a pendant loop on the back of the cookie for the ribbon. It is not an ideal solution, but it kind of worked.
The next step is to finish the piece with Mod Podge. I decided to give it a gloss coat on the front and the back. Set that aside to dry completely before adding the ribbon.
I highly suggest that you get some pink glitter ribbon for the necklace. Something like this. I did not have any on hand so I tried to make some using velvet ribbon, pink paint, mod podge and pink glitter. It came out looking like a mess and glitter got everywhere. Save yourself the trouble and buy pre-made sparkle ribbon. Once you add the ribbon, your Wreck It Ralph cookie medal is done. Ready to wear or to give to your favorite Stinkbrain.
Thanks for crafting with me. If you make a Wreck it Ralph Cookie Medal or any other Disney-inspired craft leave me a comment and let me know, or tag a photo on Twitter or Instagram #geekymcfangirl or #craftymcfangirl. I’d love to see what you do!

Fandom Jewelry from GeekyMcFangirl.com
Disney Jewelry: Minnie Mouse Key Chain This Minnie Mouse key chain is inspired by Disney’s sweet and stylish Minnie Mouse. This accessory is great for Disneybounding and showing off your fandom. It makes a wonderful gift. Made by hand with red, yellow, and black beads paired with an elegant metal Minnie Mouse key charm.
Some of the links in this post are affiliate links. Thank you in advance for shopping with them and supporting me. Any purchases you make, help me develop more craft projects for craftymcfangirl.com and film more tutorial videos for the GeekyMcFangirl YouTube channel. You are awesome!
I am a PLAID Ambassador. While I am not being paid to promote their brand, I do receive PLAID brand craft materials to use in my blog posts and videos. Mod Podge is my favorite PLAID product and I am proud to be a PLAID ambassador and to recommend their products. All opinions are my own.