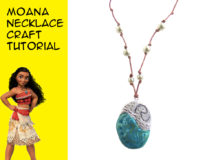
Make a Heart of Te Fiti Moana Necklace

Grab some clay and make a Moana Necklace with me. This project only takes an hour or so, and it is a fun way to show your love of Disney’s Moana. You can wear this necklace Disneybounding or anywhere. If you get a lot of compliments while wearing it, as Maui says, “you’re welcome.”
Here’s the tutorial video
And Now For A Related Geeky Product

Disney Moana Squeeze and Scream HeiHei. In Disney’s Moana, Heihei, is the world’s dumbest chicken. There’s no one upstairs. The lights are off. He blatantly lacks the minimum skills necessary for basic self-preservation. Still, Moana refuses to let him be eaten—she’s a good person and imagines Heihei possesses an inner strength that has yet to be discovered. However, when Heihei becomes an accidental stow-away on Moana’s canoe, he is a constant complication, continually finding ways to put himself in danger.
DIY Moana Necklace

MATERIALS YOU WILL NEED
polymer clay
metallic paint
brown waxed cotton cord
eye screw
dap glue
pearl beads
a straight (sewing) pin
small paint brush
STEP BY STEP INSTRUCTIONS
THE NECKLACE:
Cut about 20 inches of brown twine and find the middle of the piece. Tie an eye screw in the very center of the necklace.
On one side of the twine, measure about an inch up from the center and tie a knot
On the other side of the twine tie another knot at the same height so it lies right next to the first one when you hold them side by side.
Add a drop of glue on the center knot holding the eye screw, so that it would not come untied or shift around.
String on two pearls or white beads.
A straight pin can help you to tie knots at the top of each bead without leaving extra space. Simply slide a pin into the twine where you want to tie the knot. Then tie the knot around the pin before removing it. This will keep your knots nice and tight.
Repeat the process with the second bead.
Once you have the first two beads on, it is time to repeat the process 4 more time. Measure three quarters to one inch up from the first beads and tie on two more. Then measure again and add two more beads.
Sometimes you might need to use the straight pin to help you get the twine through the bead’s hole.
If the end of your twine gets frayed, you can trim the end to a point with scissors.
Once you have all 6 beads on, the next step is to add a closure. You can tie on a hook and loop like I did. I added a drop of glue on each knot to make sure it would not come untied over time.
Once the glue dries, trim away the ends of the twine.
THE PENDANT:
Look up a reference photo online
Start with an oval of aqua clay and create a cabochon shape on a flat surface.
Then use a tool to press an indentation into the top of the oval in the shape of a wave.
Use a dotting tool or a sharp pencil to poke four to six holes along the left side of the pendant similar to an abalone shell
Next take a small piece of white polymer clay and shape it to fit inside the wave shape you made. If it does not fit perfectly, that is okay, because you can trim the edges to make it fit an oval shape.
Then use your fingers or a blending tool to smooth the edges.
Check out your reference photo again when using a dotting tool to create the pattern on the white portion. It looks like a simple wave and sun with a geometric border.
Once the pendant is complete, right before baking, make a hole in the top with the eye-hook from the necklace
Bake according to the instructions on your clay package. Baking time and temperature may vary by clay brand and the size of your project.
Once the pendant is baked and completely cool it is time to add the abalone shell details. I used two colors of metallic paint. Pearl turquoise and Halo blue gold. You can use any two colors you have that are similar. Metallic or iridescent will look the most accurate.
Use a very small amount of paint on a small brush. Paint swirling patterns of each color on the aqua portion of the pendant.
Next add detail to the top portion of the pendant with pewter paint. Use a watered down portion of paint to create a wash that will flow into the sculpted areas.. Then pat the paint with a paper towel to remove some of the color on the top, leaving it only in the lower areas to show the detail.
Once the paint has dried it is time to connect the pendant to the necklace. I used a drop or two of DAP rapid fuse. It takes 30 seconds to bon and only 30 minutes to cure. Then, screw the eye pin into the hole and let the glue dry completely before wearing the necklace.
Once the glue and paint are dry you can add a layer of varnish to protect the paint, or you can consider the project done. Your Moana necklace is ready to wear.
Thanks for crafting with me. If you make a Moana Necklace or any other Disney-inspired craft leave me a comment and let me know, or tag a photo on Twitter or Instagram #craftymcfangirl or #geekymcfangirl. I’d love to see what you do!

Fandom Jewelry from GeekyMcFangirl.com
Disney Princess Jewelry: Ariel Charm Bracelet. This Ariel charm bracelet was inspired by Disney’s The Little Mermaid. Show your love of this beautiful Disney princess and your fandom of Disney when you wear this fairy tale bracelet. Great for Disneybounding and makes an enchanting gift.
Some of the links in this post are affiliate links. Thank you in advance for shopping with them and supporting me. Any purchases you make, help me develop more craft projects for craftymcfangirl.com and film more tutorial videos for the GeekyMcFangirl YouTube channel. You are awesome!
I am a PLAID Ambassador. While I am not being paid to promote their brand, I do receive PLAID brand craft materials to use in my blog posts and videos. Mod Podge is my favorite PLAID product and I am proud to be a PLAID ambassador and to recommend their products. All opinions are my own.
This project is part of my Disney Princess Project, so don’t forget to check out my other Disney princess-inspired craft tutorials, videos and posts.