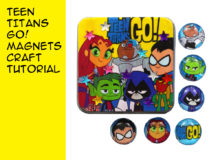
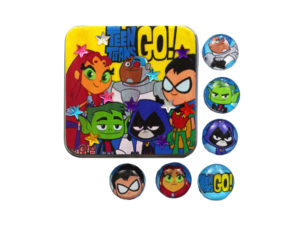
Make Teen Titans Go! Magnets With Mod Podge

I decided to make Teen Titan Go! magnets with the comic book I got on Free Comic Book Day. This DIY craft is a fun way to recycle, and makes an inexpensive gift for anyone who loves the Teen Titans Go characters. Somehow, I lost the footage so I re-made the craft using images I found online. You can find your own favorite images or use the pattern I made below.
Let me know in the comments below who your favorite Teen Titans Go! character is. I can’t decide between Raven and Beast Boy.
Here’s the tutorial video

DIY Teen Titans Go! Magnets
MATERIALS YOU WILL NEED
a purchased metal tin or Altoids tin if you have one
magnets
dap rapid fuse glue
clear luster glass décor gems from the dollar store
or glass cabochons
scissors
mod podge
paint brush
rhinestones (optional)
STEP BY STEP INSTRUCTIONS
Originally, I crafted this project using a Teen Titans Go! comic book. I cut out several characters and collaged them together to cover a tin. Unfortunately I lost the original footage, and when I re-filmed the project I had to find images online to use instead. So I created myself a pattern. You can find your favorite images online or feel free to download and print out the free pattern at the link below the video. If you print out images with an inkjet printer, it’s important to seal the ink before using Mod Podge on top. In a well ventilated area, spray the printout with matte acrylic sealer or varnish.. Let it dry completely, give it a second coat, and let it dry completely again.
I am working with a three-and-a-half inch square tin. So I will trace around and trim out the square image. If you are using an Altoid mints tin, you can use the rectangle pattern instead. Trim out the image you want to use. Then trace around the tin you are using and trim out the exact shape.
If you are using luster decorative gems from the dollar store, glue them onto the images you want, then trim around the irregular edges after the Mod Podge has dried. If, instead, you are using one-inch glass cabochons, you can trace around the cabochons and trim the images out, or you can use a one in circle punch to cut the images into the exact size shape that is needed.
Next it’s time to use Mod Podge to glue the images to the tin. Cover the tin with a thin layer of Mod Podge, and place the image on top. Smooth it out from the center to the edges. Make sure to push any bubbles out from under the paper. Then set it aside to dry.
While the tin is drying, it’s time to Mod Podge the magnets. Repeat the process. Brush a thin layer of Mod Podge on the glass and smooth the paper onto the back. Then, set them aside to dry.
Once the tin and magnets are dry, the next step is to seal the image on the tin with a layer of Mod Podge. Smooth on a thin layer of Mod Podge with as few brush strokes as possible so that you don’t scrub the image or make the ink bleed.
While the tin is drying again, the next step is to glue or stick on the magnets. I am using self-adhesive magnets on this project. If you have plain magnets, simply glue them onto with super glue or a hot glue gun.
Next it’s time to put a second layer of Mod Podge on the tin. Rhinestones are optional. If you want to add them, make sure to place the rhinestones down while the second layer of Mod Podge is still wet.
When the second layer of Mod Podge has dried, the final step is to add the magnets to the inside of the tin.
Thanks for crafting with me. If you make Teen Titan Go! Magnets or any other cartoon-inspired craft leave me a comment and let me know, or tag a photo on Twitter or Instagram #geekymcfangirl or #craftymcfangirl. I’d love to see what you do!

Fandom Jewelry from GeekyMcFangirl.com
Welcome To Night Vale Jewelry: Cecil Palmer Earrings. Turn on your radio and hide.
These Cecil Palmer earrings feature a silver and purple microphone. Cecil has known since he was a child he would work at the Night Vale Community Radio. When Cecil was five years old, the prophecies were revealed saying that he would become the voice of Night Vale. That was when he first got his Little Reporter’s Book of Big Boy Note Taking, a book he makes notes in always, even when he’s not aware of it, and even when he’s not holding a pen.
Click THIS LINK to browse all my designs inspired by the Welcome to Night Vale Podcast.
Some of the links in this post are affiliate links. Thank you in advance for shopping with them and supporting me. Any purchases you make, help me develop more craft projects for craftymcfangirl.com and film more tutorial videos for the GeekyMcFangirl YouTube channel. You are awesome!
I am a PLAID Ambassador. While I am not being paid to promote their brand, I do receive PLAID brand craft materials to use in my blog posts and videos. Mod Podge is my favorite PLAID product and I am proud to be a PLAID ambassador and to recommend their products. All opinions are my own.