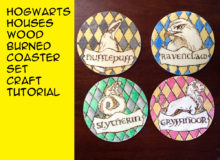
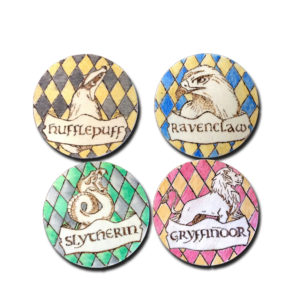
Magical Hogwarts Houses Wood burned Coasters

Now you can make Hogwarts Houses Coasters to decorate your room and show your love of Harry Potter and your favorite Hogwarts House. You can make your coaster sets with a wood burning tool and some watercolor paints. Make a set of four with all the crests or customize them to be all Gryffindor, Hufflepuff, Ravenclaw or Slitherin. Whichever house you identify with the most.
Here’s the tutorial video

DIY Hogwarts Houses Wood Burned Coasters
MATERIALS YOU WILL NEED
Patrons can download the pattern from my Patreon page
4 inch wooden rounds
Wood burning tool set
carbon paper
watercolors
water brushes
mod podge
scissors
STEP BY STEP INSTRUCTIONS
Print out the pattern on regular printer paper and trim out the circle shapes. They were created to fit a four-inch circle of unfinished wood. Also cut out four pieces of carbon paper to the same circle size.
Place the carbon side down facing the wood and the pattern on top of that. Then use blue painters tape to secure all three items together. Before I taped the edges I used a fine tip pen to trace the lines that were going to be hidden under the tape.
The next step is to use a very fine tipped pen and trace the entire pattern onto the unfinished wood piece. I used a black pen on the black pattern, but I thought about it later and I kind of wished I had used a white gel pen instead. That way I could have seen which parts I had finished and which parts still needed to be done.
You can keep one side taped and carefully check to see if you have missed any spots. But if you do this, make sure you are really careful replacing the pattern in the exact same location. Or your pattern will be off
I worked on Hufflepuff and Slitherin first. Tracing both patterns, then working with the wood burning tool. It comes with several different attachments. Because I am a beginner, I only used the pointed tip for this project. The heat meter should be turned fully into the red zone to burn into wood. I worked slowly and used a light touch until I got used to how much pressure was needed to make a nice impression.
Once you figure out how much pressure to use, the process will start to go faster for you. I kept the pattern next to the piece so that I could see any details that I might have missed while tracing on the carbon paper.
Work slowly and carefully as there is no way to erase if you make a mistake!
After I traced both the Slitherin and Hufflepuff outlines I decided to try my hand at coloring them both in. I used watercolor paint with water-filled synthetic brushes to paint in the coasters in the house crest colors. I used a light gray to represent silver and mustard yellow to represent gold.
I worked slowly and built up layers of color on the background, but I wanted to let the natural wood show through on the animals and the nameplate. So I left both of those elements unpainted.
After I finished painting the first two coasters I went back to wood burning the Ravenclaw and Gryffindor coasters and then painting them with watercolors using the same method.
When all of your coasters are completely painted and the watercolor paint has completely dried it is time to finish them with a coat or two of Mod Podge.
Now usually I would tell you that once the mod podge is dry, you can use your coasters or give them as gifts. But this time, I am going to recommend that you set your coasters somewhere safe for 28 days to allow the mod podge to completely cure.
Also, do not stack them, or they might stick together and not cure correctly. Just find a high bookshelf and place them there. And put a reminder in your calendar or on your phone to get them in 28 days.
Once the Mod Podge has completely cured your coasters are ready to be used. They will resist moisture and you can put a cold glass that might drip condensation on them. If you seal them completely, they should also be top-rack dishwasher safe. But since I only sealed the tops of mine, I would only use a damp cloth to clean them.
Become a Patron!
Thanks for crafting with me. If you make Hogwarts house crest coasters or any other Harry Potter-inspired craft leave me a comment and let me know, or tag a photo on Twitter or Instagram #geekymcfangirl or #craftymcfangirl. I’d love to see what you do
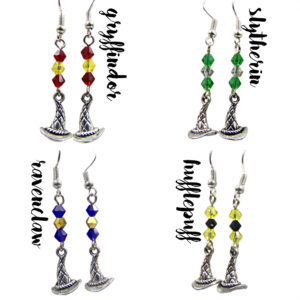
Fandom Jewelry from GeekyMcFangirl.com
Sorting Hat Earrings
Harry Potter jewelry for your first year at Hogwarts! These colorful earrings feature a silver Sorting Hat charm and faceted beads representing your House: scarlet and gold for Gryffindor, blue and bronze for Ravenclaw, yellow and black for Hufflepuff, or emerald green and silver for Slytherin. These Harry Potter earrings are perfect for back to school at Hogwarts School of Witchcraft and Wizardry.
Some of the links in this post are affiliate links. Thank you in advance for shopping with them and supporting me. Any purchases you make, help me develop more craft projects for craftymcfangirl.com and film more tutorial videos for the GeekyMcFangirl YouTube channel. You are awesome!
I am a PLAID Ambassador. While I am not being paid to promote their brand, I do receive PLAID brand craft materials to use in my blog posts and videos. Mod Podge is my favorite PLAID product and I am proud to be a PLAID ambassador and to recommend their products. All opinions are my own.