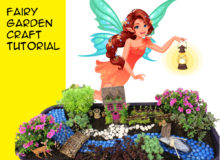
How to make a fairy garden from planning to completion

This tutorial will show you How to make a fairy garden. If you have ever wondered how to tackle the entire project, from planning to completion, this DIY fairy garden video will show you how I did it.
Here’s the tutorial video
How To Make A Fairy Garden DIY
MATERIALS YOU WILL NEED
wooden house
folk art acrylic paint
weatherproof sealant
decorative glass gems
decorative rocks
glue gun and glue sticks
miniature plastic plants
moss
grout
stone tile
paint brushes
balsa wood
rotary tool
twine
cardboard and a box cutter
soil and plantings from a garden store
tacky or school glue
STEP BY STEP INSTRUCTIONS
For more detail, please watch the video above.
THE PLAN: The first step is to plan out your fairy garden. I measured the container or space I have for the garden and draw it out in graph paper where one square represents one inch.
I know want to have a house and a garden beside it. So I sketch those in first Then a table and chairs on the other side, with a walkway from the house. And a river, with a bridge over it. Now that I have a river, let’s add a rowboat and a dock. Then block in where the plantings will be placed. Now let’s color it all in
Once I had a drawing of my garden plan, I decided to create an actual-sized layout using a large piece of cardboard. This step was not really necessary but I just wanted to make sure everything would fit in real life.
THE HOUSE: Get a wooden house from a craft store. The first step is to put a layer of weather proofing on the wood so it’ll hold up to the sun and rain outdoors.
Once the weather proofing sealant dried, I painted the base of the house a dark brown. We’re going to use this paint color throughout the project.
Next let’s mix up some grout with water and a wooden stir stick and use it on the side of the wooden house to create a stone façade with some small washed rocks.
Once the grout has dried, it’s time to paint the house. I went with light brown for the other side of the house, the steps and the roof.
Then I went in with a light green for the back and front of the house and bright pink for the windows and door.
Once the acrylic paint is dry it’s time to go in with a clear varnish to protect the paint and the stones as well.
When the varnish is dry, go in with some decoration around the house. I glued small stones around the door, and then used moss for the front of the house and small snips of plastic plants around the sides and the front. The moss matches the green paint and the pink flowers match the pink door and window trim.
You can use a glue gun if you live somewhere that doesn’t get too hot. But if you live in a desert area, use strong glue that will not melt in the sun instead. What a cute little house this ended up being.
THE GARDEN: Next we’re going to make a tiny fairy-sized garden to fit beside the house. I started with a piece of cardboard cut to size, You may want to use a piece of wood if you live somewhere that it rains a lot. Whatever material you use, paint it dark brown. While the brown paint is drying, mix up some more grout, or use some of the left over grout from working on the stone façade on the house. Grab your plastic plants and moss and prepare the vegetation for the garden. I made some little vegetables with plastic leaves glued onto the glass beads.
I also made some sprouts and cut up some moss for variety. Next it’s time to create the rows in your garden. Scoop out four rows of grout onto the base and shape them with a stick. Then place your vegetables and plants into the grout in rows. Let the grout dry completely before you paint it over with the dark brown acrylic paint you used for the base.
THE FENCE: Next I’m going to make a fence to keep the deer out of the garden. I took a walk at a nearby park and picked up a bunch of fallen sticks and twigs from the ground. Then I cut them to a similar size with a small saw. And used a rotary tool to sand down the ends. For every four small sticks I made one longer stick. This is so the fence will have some longer bits to stick down into the soil to hold it up. I created an archway door by gluing two larger curved sticks together. You could also create a gate with craft wire. I glued four small sticks together and then glued them to a longer stick, making eight sections. Then I glued four sections on one side of the arch and four sections on the other side, to create the full fence. I glued twine and moss to the outside to add stability. And the finishing touch was to add a clear varnish to the wood.
THE BRIDGE: While I had the sticks and rotary tool out, I decided to make the bridge. I cut a bunch of twigs the same width and finished all the edges with the rotary sander. I ended up using 26 for my bridge. I also finished two longer curved twigs to the length of the cardboard I was using for the bridge, and six taller twigs to create a railing. Using cardboard, twigs, twine and a glue gun I created a bridge. Don’t forget to use waterproof varnish to finish your bridge.
THE DOCK: I made my dock out of three pieces of wood glued together, and then I cut the legs of the dock with a cutting blade on a rotary tool. To add a few fun details, I use two small barrels from a miniatures set and some twine to represent rope. I painted the dock a dark brown with lighter streaks to represent planks of wood, and painted the barrels a light tan.
BOAT: Next it was time to make the boat. I used a mussel shell that I got from a dinner. I added a small piece of wood left over from making the dock, as the seat inside the boat. I trimmed down two appetizer toothpicks to represent the oars. I just glued them onto the sides, but you could use wire to secure the oars if you want to
RIVER: Remember our large cardboard planning map? To make the river, I cut out a shape of cardboard in that I painted it with blue acrylic paint. Once that dried, I painted over top with blue glitter paint. Once the glitter paint dried, I glued on aqua colored decorative glass gems from the dollar store.
WALKWAYS: To create the walkways around the fairy house, I used a piece of stone tile from the hardware store. I traced the shape I wanted onto the back of the tile and trimmed out around the stones with scissors. I liked the way it came out so much that I made more than one walkway.
TREE WITH SWING: I wanted to add a tree with a tiny swing into the garden. So I used a piece of cardboard as a base, and glued a tree shaped twig into the center of it. The base will be hidden under the soil of the fairy garden. To create the swing I used another tiny piece of wood left over from making the dock and two pieces of twine. I used a rotary tool to smooth the edges. Then I drilled two small holes through the swing seat and tied the twine through. Tying the ends to the tiny tree branch
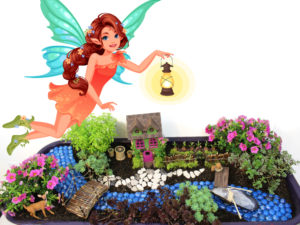
LANDSCAPING: I started with a bag of soil that would fill my container, which is a little wagon. Then I added some of the small plants according to the planning map we made at the beginning.
Before putting all the plants in, I put down the river, and then tucked some plants around it Then I added the tree with the swing, the garden, the fence and the little house. I added the walkways and the bridge over the river. Then I added the dock and the rowboat. I created a table and two chairs out of three wooden thread spools and added a miniature deer as a finishing touch.
Thanks for crafting with me. If you make a fairy garden leave me a comment and let me know, or tag a photo on Twitter or Instagram #geekymcfangirl or #craftymcfangirl. I’d love to see what you do!

Fandom Jewelry from GeekyMcFangirl.com
Lord of the Rings Jewelry: Galadriel Earrings. Galadriel was one of the greatest of the Eldar in Middle-earth, and surpassed nearly all others in beauty, knowledge, and power.
These Galadriel earrings are inspired by the mightiest and fairest of all the Elves in The Lord of the Rings. If you love Tolkien, wear your fandom everywhere. A perfect gift for you, or for your lady fair.
Some of the links in this post are affiliate links. Thank you in advance for shopping with them and supporting me. Any purchases you make, help me develop more craft projects for craftymcfangirl.com and film more tutorial videos for the GeekyMcFangirl YouTube channel. You are awesome!
I am a PLAID Ambassador. While I am not being paid to promote their brand, I do receive PLAID brand craft materials to use in my blog posts and videos. Mod Podge is my favorite PLAID product and I am proud to be a PLAID ambassador and to recommend their products. All opinions are my own.