A Steampunk Gun from Dollar Store Items

This steampunk gun comes together with just three items from the dollar store and some glue and paint. You can decorate yours with anything you have around the house. Wire, tubing, gauges, dials or clock parts will work in place of the gears and vacuum tubes shown in the tutorial video. Have fun and personalize your steampunk gun to your personality.
Here’s the tutorial video
DIY Steampunk Gun
MATERIALS YOU WILL NEED
toys from the dollar store
ball shooter toy
plastic recorder flute
battery-powered light stick
flat black paint
gears
vacuum tubes
folk art brushed metal paint
glue gun and glue sticks
STEP BY STEP INSTRUCTIONS
Start with a Ball Shooter toy from the Dollar Store. Remove the round foam ball and elastic string . Disassemble a plastic recorder into two pieces. Spray-paint both the gun and recorder a flat back, in a well-ventilated area.
The first step is to hot glue the long portion of the recorder into the muzzle of the ball shooter. Next hot glue the short portion of the recorder onto the top of the ball shooter to create a scope detail
Go in with metallic paint. I used Folk Art metallic paint in bronze and copper. Use a dry brush technique. Wipe off most of the paint on to a paper towel before lightly brushing the bronze color over the black. Make sure the black paint shows through in the recessed areas. Once the bronze paint has dried, use a small paintbrush and a contrasting metallic paint to pick out some of the details.
Next it’s time to add some fun Steampunk details. I decided to add two vacuum tubes to the gun. I hot glued one at the front of the scope and one at the front of the barrel. Next I added Bronze and Copper gears to decorate both sides of the handle. If you don’t have gears or vacuum tubes, you could use wires, clock parts, gauges, dials or tubing. Anything you have around your home that can be painted and hot glued will work.
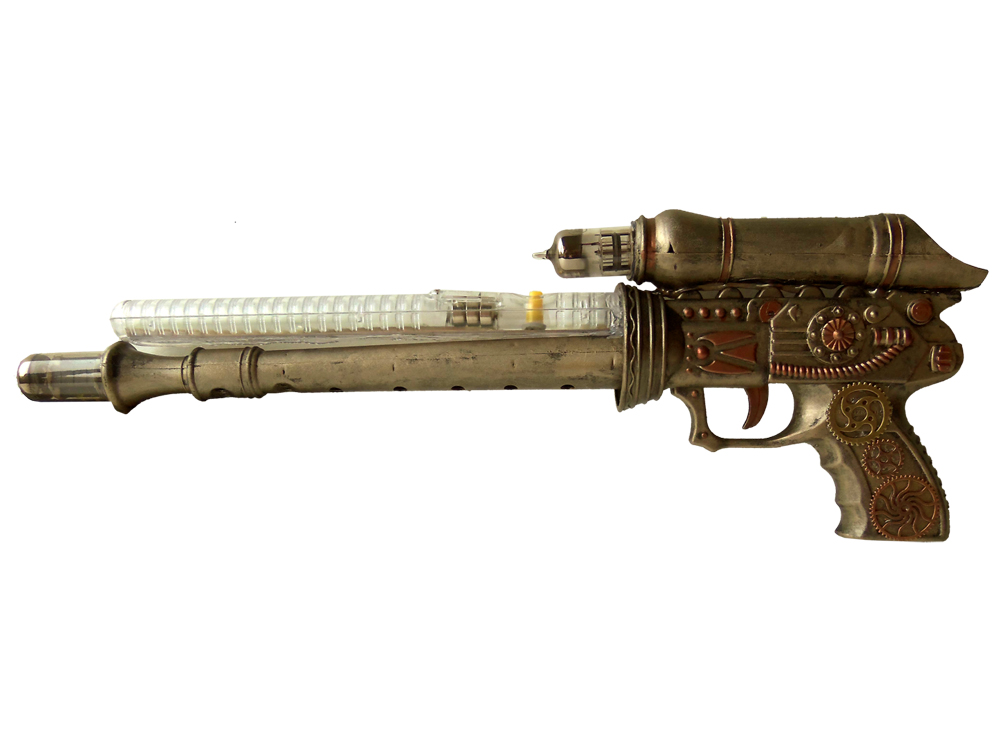
Next, it’s time to glue the light stick to the top of the gun. This light stick is also from the Dollar Store. It has several different light pulse settings. Make sure to glue the stick with the power button facing upward so you can turn it on and off easily and you are able to replace the batteries. Make sure not to paint the light stick or obscure the colorful lights too much with decorations.
And your steampunk gun is complete, ready to add to any steampunk cosplay or use it as a display item.
Thanks for crafting with me. If you make a Steampunk gun or any other Steampunk-inspired craft leave me a comment and let me know, or tag a photo on Twitter or Instagram #craftymcfangirl or #geekymcfangirl. I’d love to see what you do!

Fandom Jewelry from GeekyMcFangirl.com
Steampunk Jewelry: Golden Fairies. These beautiful steampunk earrings are bronze fairies suspended beneath pale amber glass gems. Perfect for Steampunk cosplay.
Some of the links in this post are affiliate links. Thank you in advance for shopping with them and supporting me. Any purchases you make, help me develop more craft projects for craftymcfangirl.com and film more tutorial videos for the GeekyMcFangirl YouTube channel. You are awesome!
I am a PLAID Ambassador. While I am not being paid to promote their brand, I do receive PLAID brand craft materials to use in my blog posts and videos. Mod Podge is my favorite PLAID product and I am proud to be a PLAID ambassador and to recommend their products. All opinions are my own.