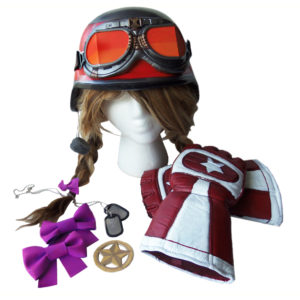
Cosplay Costumes Series: Sgt. Hammer from Heroes of the Storm – Belt, Bows & Hammer

This is part one in my four-part cosplay costumes series for Sgt. Hammer from Heroes of the Storm. This video will teach you how to make Sgt. Hammer’s Belt, Bows and Hammer. Check out the other three videos in this series to complete your Sgt. Hammer cosplay costume.
Part 2: Sgt. Hammer’s Gloves
Part 3: Sgt. Hammer’s Helmet & Goggles
Part 4: Sgt. Hammer’s Wig & Clothing
Become a Patron!
Here’s the tutorial video

And Now For A Related Geeky Product
Avengers Assemble Thor Molded Hammer. Officially licensed Marvel Universe merchandise that you can modify to make Sergeant Hammer’s Hammer prop!

DIY Cosplay Cosumes Sgt. Hammer Belt, Bows & Hammer
MATERIALS YOU WILL NEED
pink fabric, felt or craft foam
optional pink glitter paint
and a paintbrush
alligator clips
glue gun and glue sticks
scissors
brown canvas belt
optional military belt pouches
4 inch wooden circle
4 inch wooden star
brushed bronze acrylic paint
brushed gold acrylic paint
brushed silver acrylic paint
brown acrylic paint
wood glue
thick gauge brass or gold wire
hand drill
toy hammer
STEP BY STEP INSTRUCTIONS
Sergeant Hammer’s belt buckle.
Start with the wooden disk and brushed gold paint. Make sure you have full coverage with the gold paint and then let it dry completely. Working with Folk art brushed gold and brushed Bronze give the star a two-tone look. Remove any hardware from the wood shape and then go in with the darker color and paint every other diamond. Let the bronze paint dry. Then go in with the lighter gold color and paint the remaining diamonds gold and let the gold paint dry. Don’t forget to go back and paint the edges of the star with the corresponding metallic paint you used on the top.
Go in with a black marker and outline the edges of the star and create an inner circle on the background disc. Then glue down the star to the disc. I recommend wood glue for a permanent bond.
Add wire to the buckle so it can be affixed to the belt. Drill two small holes on the left and the right. Then run a piece of wire up through the back to the front on each side. The wire is going to be wrapped around the belt hardware. Make sure the belt can still open and close when you wrap the wire.
Another part of the belt assembly are two belt pouches. These are threaded onto the belt with loops stitched behind the pouch. They look good as is, I just decided to paint the snaps brushed gold. While you have the brushed gold paint out, you can add gold details on your camouflage pants if you want to. There are four gold brads on each knee.
Sergeant Hammer’s boots and pigtail Bows.
Cut out pieces from pink felt or craft foam. You will need two large bows for the boots and two small bows for the pigtails. For the large bows, start with felt that is 9 inches long and two inches wide. This is going to be folded in with an inch gap. The center of the bow is one and a half inches wide and 4 inches long. The tails of the large bow should also be around one inch wide and four inches long.
These are the steps to make the large bow. Using hot glue fold in and glue the left and right sides of the bow with a one inch gap in the middle. Then pinch the center of the bow and hot glue the small center piece around it. Glue it in the back and cut off any extra. Next it’s time to cut the tail ends for the bow. Start with your one by four inch pieces. Trim the rectangles in to flared tails and glue them together at a slight angle. Then hot glue the bow on top. The next step is optional, but I like to add glitter to everything, so I decided to add some pink glitter paint to my bow. Once the paint is dry, the final step is to attach an alligator clip to the back with hot glue. Don’t forget to make two bows.
The hair bows are much simpler. Use a small rectangle of felt and pinch the middle. Glue the middle together. Then wrap a small strip of felt around the center and glue it in the back, trimming any excess. Then add an alligator clip with hot glue. Once again I added some sparkle. Once the glitter paint has dried your bows are ready to clip right onto your boots and wig.
Sergeant Hammer’s hammer prop.
Start with a toy plastic Thor hammer, some dark brown paint and some brushed silver paint. Cut off the fabric wrist strap, then paint the entire handle the same color brown. Use the silver brushed metal paint and cover the silver portion of the hammer. Make your brush strokes in all different directions to enhance the metallic look. Be sure to give both the handle and the top of the hammer two or more coats for full coverage.
When the paint is dry it’s time to add a star to the front of the hammer. You can do this freehand or you can do what I did. I found a star shape online and printed it out the right size for the project, then cut out a stencil to trace around.
The final step is to add a generous coat of Mod Podge matte to the entire hammer to protect the paint and star design from chipping. Once the mod podge has dried completely your hammer is ready to add to your cosplay.
Thanks for crafting with me. If you make a Sgt. Hammer Cosplay Costume or any other Heroes of the Storm -inspired craft leave me a comment and let me know, or tag a photo on Twitter or Instagram #craftymcfangirl. I’d love to see what you do!

Fandom Jewelry from GeekyMcFangirl.com
Heroes of the Storm Jewelry: HotS Charm Bracelet. The charms on this bracelet are inspired by many of the battlegrounds in Heroes of the Storm. The raven represents Cursed Hollow. The spider represents Tomb of the Spider Queen. The Anubis head represents Sky Temple. The angel wing represents Battlefield of Eternity. The treasure chest represents Blackheart’s Bay. The zerg represents Braxis Holdout. The flower represents Garden of Terror. The sword represents Infernal Shrines. The pumpkin represents Towers of Doom. The warhead represents Warhead Junction and the Dragon represents Dragonshire.
Some of the links in this post are affiliate links. Thank you in advance for shopping with them and supporting me. Any purchases you make, help me develop more craft projects for craftymcfangirl.com and film more tutorial videos for the GeekyMcFangirl YouTube channel. You are awesome!
I am a PLAID Ambassador. While I am not being paid to promote their brand, I do receive PLAID brand craft materials to use in my blog posts and videos. Mod Podge is my favorite PLAID product and I am proud to be a PLAID ambassador and to recommend their products. All opinions are my own.
http://www.geekymcfangirl.com/home/product/hots-charm-bracelet-heroes-of-the-storm-jewelry/