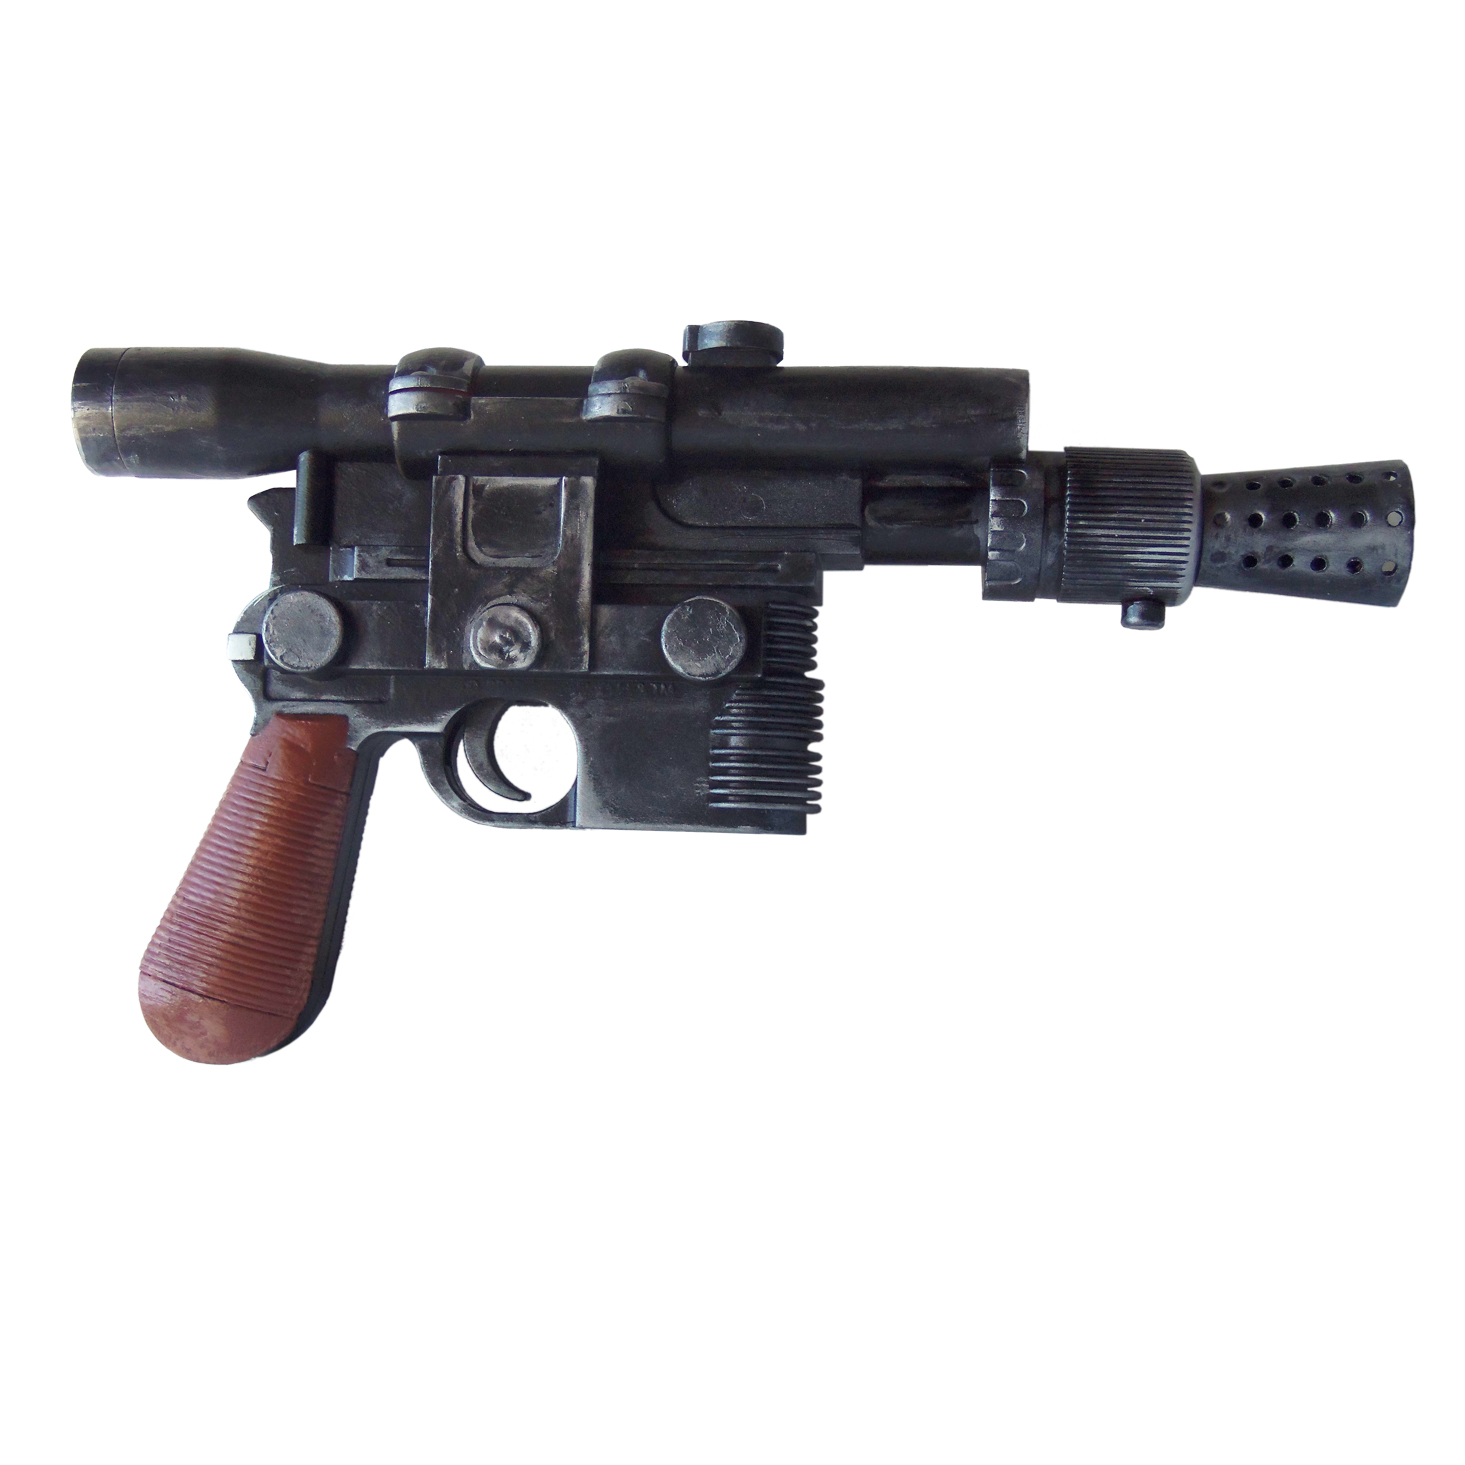
This Han Solo Blaster makes the perfect gift for your favorite scoundrel

This Han Solo Blaster Cosplay prop starts with a toy gun. Are you working on a Han Solo costume? This DIY tutorial offers step by step instructions on how to create a blaster that looks like it came from the Star Wars universe. With this blaster prop you’ll be ready to take on the Empire and fight for the Rebel Alliance. Or maybe you’re just in it for the money. Either way, may the Force be with you.
This video was a collaboration with Celtic Ruins Designs. Check out her video here
Here’s the tutorial video

And Now For A Related Geeky Product
Han Solo Cosplay Belt with Holster. The surface of the belt has a rugged and weathered look, making it more screen accurate. Includes attached pouches, rivets and buckles.
DIY Han Solo Blaster
MATERIALS YOU WILL NEED
han solo blaster
bondo
sand paper
flat black paint
metallic antique silver paint
bright silver rub and buff
medium brown paint
Mod Podge Matte
paint brush
STEP BY STEP INSTRUCTIONS
Start with a toy gun. I recommend the Han Solo blaster from Rubie’s Costumes.
The first step in this repaint is optional. Filling in all of the screw holes with bondo. You only need a very small amount. Combine a bit of white putty with a very small amount of the red activator crème. Mix it quickly until it forms a pink paste. You will only have a few minutes of working time before it starts to harden. Mix the hardener in completely. If there are any streaks of unmixed material it will stay sticky forever. Fill in each one of the screw holes with a dollup of paste. Then set the gun aside until the bondo hardens. Once the bondo hardens, the next step is to sand it down so it is smooth. This is where you can fix any mistakes you made when applying the bondo.
If you skip the bondo step, you will still want to sand down any raised lettering on the toy.
Another optional step is to use a drill to open up all of the holes in the muzzle of the gun. It’s not necessary, but it does add something to the prop if you want to make a realistic cosplay.
Once your gun is sanded down, it’s time to give it a generous coat of matte black spray paint.
Next we’re going to add accents with dark silver acrylic paint, and silver Rub n buff. Use a dry paintbrush and a small amount of acrylic paint. Use a dry brush technique to place a small amount of paint on the edges of the gun, to make it look weathered and like it has seen a lot of use. Let the paint dry completely before continuing.
The next step is to use rub n buff to add brighter silver accents. Rub n buff is a pigmented wax that works by warming it up between your fingers and then rubbing it onto the gun. The more you rub it, the shinier it will become. You can get a chrome-like appearance if you use enough of this product and really buff it out. But in our case, we’re going for a dull silver accent. Apply it lightly and only to the corners and edges where you want a little shine.
Focus quite a bit of silver accent paint on the muzzle of the gun.
If you go a little bit overboard on the silver, you can always go back in with a little bit of black paint on a dry brush and darken any overly-shiny areas.
Next it’s time to work on the handle grip. Use hazelnut brown paint to give it a wood look. It may take a couple of coats to get opaque coverage. Make sure the black doesn’t show through. Once the paint is dry, you can go in with a slightly lighter brown and give the handle some weathering and distressing around the edges and at the bottom. Let the paint dry completely before continuing.
Once the paint is dry, the finishing touch is to coat the entire prop gun with Mod Podge Matte. This will protect the paint from chipping without adding too much shine. You will know the Mod Podge is dry when the white color becomes completely clear. Once the Mod Podge is dry, your Han Solo Blaster is ready to add to your cosplay!
Thanks for crafting with me. If you make a Han Solo Blaster or any other Star Wars-inspired craft leave me a comment and let me know, or tag a photo on Twitter or Instagram #craftymcfangirl. I’d love to see what you do!
Fandom Jewelry from GeekyMcFangirl.com
League of Legends Jewelry: Blue Nexus Necklace. This Blue Nexus necklace is inspired by the MOBA League of Legends. It is handmade with a 1.5 inch faceted glass gem surrounded by gold-tone spacer beads, hanging from an 18 inch gold-tone brass chain. The perfect gift from GeekyMcFangirl.com
Some of the links in this post are affiliate links. Thank you in advance for shopping with them and supporting me. Any purchases you make help me develop more craft projects for craftymcfangirl.com and film more tutorial videos for the GeekyMcFangirl YouTube channel. You are awesome!
http://www.geekymcfangirl.com/home/product/league-of-legends-jewelry-blue-nexus-necklace/